Raptor Documentation
Table of Contents
Raptor Email Security End User Guide
Raptor Email Security only blocks email where we can be certain that the email is Spam or malicious. Otherwise, the email will be scored by our system and the subject changed for Spam.
Many competitors use techniques that delay mail flow and incorrectly block legitimate emails. PCCC is a vocal opponent of these techniques.
How do I find an email that is missing from my Inbox?
We take missing email very seriously. First, please check your Spam and Junk folders. If you still don’t find the missing email, please email support@pccc.com with the sender’s email address, the subject and the date/time. We will perform a log review.
How do I get rid of Spam in my Inbox?
Using Raptor is the first step! If the subject has Spam in it, then Raptor is working correctly. You can use rules to move these to other folders.
If you receive emails that ARE Spam but are not marked as Spam, please see the instructions below to submit these to PCCC for review.
How do I fix it when there is an email incorrectly marked as Spam?
These emails are called False Positives (FPs). Please see the instructions below to submit these to PCCC for review.
How do I send PCCC an email for Review?
The best way to submit an email for review is to create a new email message and drag the email to review over to the new email message as an attachment.
IMPORTANT: To make sure we get your email and it isn’t filtered, you will need to email the sample to a special address. Please email support@pccc.com or call (703) 359-9700 to receive the email address for submissions.
How do I Allow or Block a Specific Email?
Raptor Email Security is fully managed. By submitting emails for review and emailing our support, PCCC will make all the necessary configuration and algorithmic changes needed to block the bad email while keeping good mail flowing.
Why do my emails say [New], [Spam], [External], [Phish], etc. in the Subject?
Raptor Email Security uses these tags to convey important information about the email. The [Spam] or the older *****SPAM***** tags means Raptor identified the email as spam. The [External] means the email came from external. The [Phish] tag means that there is a high potential this is a phishing attempt or someone with a similar name at your firm. [New] means that this is a new email address that is contacting you. Used in combination, these tags can help greatly to keep your email safe and secure!
Raptor Email Security Admin User Guide
Raptor Headers & Rules
Raptor does not delete Spam emails but rather scores and tags them. If your users don’t want to see these emails in their Inbox, most email clients can use rules to move the Spam to a folder.
There are two Raptor headers that will be of interest: X-Spam-Status: & X-Spam-Level.
X-Spam-Status will include a Yes or No if Raptor marked it as Spam along with the total hits, the required score, and all the Raptor rules & subrules.
X-Spam-Level: will contain an asterisk for every integer in the email’s Raptor score. For example, a score of 5.99 would have a header of X-Spam-Level: *****.
The X-Spam-Level header is useful with rules to organize your email into folders. PCCC recommends rules to move Spam scoring below 15 into a folder named SPAM and Spam scoring 15 and over into a folder named SPAM15 The spam scoring over 15 will rarely contain incorrectly tagged emails.
If you use Microsoft Outlook, click here for instructions. If you use Mozilla Thunderbird, click here for instructions. If you use IMAP on PCCC’s cPanel infrastructure and would like rules added on the server for all of your users, please email support@pccc.com. NOTE: The process for creating rules is usually very straightforward and available in any modern mail client.
Raptor Configuration
Raptor Email Security administrators can access https://Raptor.PCCC.com where you can do the following for your organization:
- View Spam Statistics
- Manage Raptor Continuity
- Set a company-wide Auto-Responder
- Block or Allow emails by Subject, Sender or Recipient
- View Billing Information
- Manage Raptor FAST Submissions
Raptor is designed around algorithms that are continuously improved and maintained by PCCC. You should NOT typically need to enter many entries into the welcomelists or blocklists. One exception to this rule is mailing lists and newsletters.
IMPORTANT: Raptor Email Security is fully managed. We recommend that you instruct your users to submit emails for review and email our support. PCCC will make all the necessary configuration and algorithmic changes needed to block the bad email while keeping good mail flowing to save you time for other administrative duties.
Raptor Anti-Spam Compendium
PCCC advocates for those interested in learning more about Anti-Spam, to take a look at our Anti-Spam Compendium located at: https://raptoremailsecurity.com/raptor-email-anti-spam-compendium/
Notice for Managed Service Providers
The following information has been prepared for Managed Service Providers (MSPs).
Raptor Email Security MSPs can access https://Raptor.PCCC.com where you can view your overall billing information as well as easily impersonate the administrator of any of the organizations under your management
Raptor Remarks
Raptor Remarks are color-coded inline messages that offer guidance and alert users to potentially harmful emails.
Here is a list of all Raptor Remark tags and their meaning:
| Name | Message | Color | Definition |
| Javascript | This email has HTML code which may be dangerous. Iframe, object, and script tags are removed. | Orange | The email has Javascript content on the body or on an attached html file, the Javascript code has been removed from the email |
| Imposter | WARNING: This email is likely from an imposter hitting custom rules for this purpose. Please contact Raptor Review if you have ANY questions and avoid interacting with this email. | Pink | The email is from an imposter because it hits the KAM_BEAL SpamAssassin rule |
| Macro | The attachment is a Microsoft Office file which contains Macros. Macros can be very dangerous and should be vetted before using. If possible, ask the sender for a copy without macros. | Red | The attached file is an Office Document with a macro that could be dangerous |
| Image Tracking | Image Tracking Removed in this message. | Yellow | There is a link to a tracking pixel/image in the body of the email, the tracking image has been removed |
| External | Please be careful! This email is from an EXTERNAL sender. Be aware of impersonation and credential theft. | Yellow | Email is coming from an external sender |
| Spam | Warning! This email was marked as spam by Raptor Email Security with a score of X out of Y. If it’s miscategorized, please submit it to Raptor Review. | Pink | Email has been tagged as spam |
| Phish | WARNING: This is potentially a phish with a name similar to one in your organization. Please be careful of phishing and impersonations. | Pink | Email is a phish tentative because it hits a specific rule for that customer |
| New | Warning! This email is from a new person or someone you haven’t corresponded with very often. | Orange | Email is from a new sender for the domain |
| Malware | An attachment that was potential dangerous was removed as a possible zero day malware risk. | Orange | A zero day attachment has been removed |
| Security Issue | The Sender has poor domain security and should be checked carefully | Orange | Spf, Dkim or Dmarc has failed or is not present (KAM_LAZY_DOMAIN_SECURITY hits) |
Setting up Raptor FAST WHM Module for cPanel
Goal:
This guide will lead you through the steps to deploy RaptorFAST for cPanel using the WHM Module
Prerequisites:
Ability to modify DNS for the domains to change the MX Records
Ability to access WHM Administrative Panel
Sudo privileges in order to install a few packages
AlmaLinux 8 Installation Steps:
- Run: ‘sudo dnf install https://yum.pccc.com/pcccwhm/8/noarch/Pccc-WHM-Extensions-Repo-1.0.0-1.el8.noarch.rpm’
- Run: ‘sudo dnf install whm-raptor’
CentOS 7 Installation Steps:
- Run: ‘sudo yum install https://yum.pchttps://yum.pccc.com/pcccwhm/8/noarch/Pccc-WHM-Extensions-Repo-1.0.0-1.el8.noarch.rpm’
- Run: ‘sudo yum install whm-raptor’
IMPORTANT: CentOS 8 is End of Life and CentOS 8 Stream is not supported for cPanel. Contact support@pccc.com if you need more assistance.
WHM Administrative Panel Instructions:
- Login to your cPanel WHM Admin Panel
- Navigate to the Plugins > Raptor Email Security Page
- Enter the license code received from the WHMCS email. (IMPORTANT: If you do NOT have your license or the email, please reach out to support@pccc.com)
- Enter the preferred username and contact email address
- After completion, you will have created your Raptor Email Security account.
- You should shortly receive an email with instructions to reset your password.
- The Reset Password email will also provide instructions to deploy your first domain(s).
Note: If unsuccessful, a step may have been missed or something was entered incorrectly. Reach out to support@pccc.com for assistance if error persists.
Raptor FAST Self-Deployment for Google Apps Users
Goal:
This guide will lead you through the steps to self-deploy RaptorFAST for Google Apps.
NOTE:
RaptorFAST for Google Apps is intended to be run manually.
Prerequisites:
Administrator access to “admin.google.com”. Navigate to “admin.google.com” to begin.
Google Admin Steps:
- Click the “Security” tab.
- If not seen, click “More Controls”, then click “Security” from the options shown.
- Select “Overview” in the “Security” tab.
- Go to the “Access and Data Control” tab and click the down arrow. Then select “API Reference”.
- Verify the “Enable API Access” checkbox is checked.
- If it is NOT, then check the box and SAVE the changes.
- Make sure the “Trust-Internal Domain-Owned Apps” checkbox is checked.
- If it is NOT, then check the box and SAVE the changes.
- Verify the “Enable API Access” checkbox is checked.
- Navigate to “https://docs.google.com/spreadsheets/d/1eKBUL3yXAN0TPzkS-L3kyEyGl9G2HCCeXrSd3j8sWCM/”.
- Create a copy of the “RaptorFAST for G-Suite” spreadsheet and save this copy to the “My Drive” or “Shared Drive” locations.
- ENSURE it is a COPY as there is backend code that must be run.
- Move the copy to the folder where you want it.
- Navigate to “https://console.cloud.google.com/home/dashboard”.
- Once these steps are finished, continue to the “Google Cloud Platform” steps.
Google Cloud Platform Steps:
- In the “Google Cloud Platform” console, create a new project.
- From the project dashboard in the console, go to the “API console”
- Then go to “API Overview”.
- Use the “Enable APIs and Services” button to open the “API Library” page.
- Search for “Admin SDK”, click its button, then click “Enable“.
- Click “APIs & Services” and go to “OAuth consent screen”.
- Go through the configuration for the “OAuth consent screen”.
- Go back to “Cloud Overview” and then “Dashboard”.
- Copy the “Project Number” from the Project Info portlet.
- Open the copied version of “RaptorFAST for G-Suite”.
- Use “Extensions->Apps Script” to open a new script editor tab, which will have the sheet’s script in it.
- On the left sidebar, select “Project settings”.
- Navigate to the “Change Project” option and select it.
- Paste the Project Number copied in Step 17. into the entry field and click “Set Project“.
Note: It will not indicate a success, it will only indicate errors.
- Save the script. Note: it SHOULD autosave.
- Enter the user’s Raptor Token into the proper cell.
- If the user is performing this self-deployment, be sure to provide them their token upon request.
- Test to make sure everything is set up correctly.
- Enter a “Debug Email” to receive the submission text to verify that the JSON is being generated properly.
- Go to the “RaptorFAST” menu in the top ribbon section and select “Run RaptorFAST”.
- IMPORTANT: The first time it is ran, you will need to authorize it to do so.
- This should begin a permission-granting process for you to walk through.
- IMPORTANT: The first time it is ran, you will need to authorize it to do so.
- After a minute or two, check the entered “Debug Email” to ensure an email was received and that there is email account data in the JSON structure.
- If successful, remove the “Debug Email” and freely perform the actual submission
- If it was unsuccessful, please review the process to ensure no steps were missed and then reach out to PCCC for assistance as needed.
Note: If unsuccessful, a step may have been missed or something was entered incorrectly. Reach out to support@pccc.com for assistance if error persists.
Email Support FAQ
Setting up your cPanel IMAP or POP Email
cPanel Webmail
Webmail access is available at https://cpanel.pccc.com:2096/.
cPanel IMAP/POP Setup Information for PCCC’s E-mail Servers
When setting up your mail client to access PCCC’s cPanel servers, there is no perfect answer for every mail client. Because of this, PCCC’s servers are flexible and support an array of options.
This information is suitable for configuring virtually any mail client for the IMAP or POP protocol using PCCC’s e-mail servers.
Incoming IMAP server: cpanel.pccc.com
- Recommended Setting: Use SSL/TLS on port 993
- You can also use TLS on port 143
- Authentication is required (using “PLAIN” or “LOGIN” mechanisms)
- No unencrypted sessions are supported
Incoming POP server: cpanel.pccc.com
- Recommended Setting: Use SSL/TLS on port 995
- You can also use TLS on port 110
- Authentication is required (using “PLAIN” or “LOGIN” mechanisms)
- No unencrypted sessions are supported
Outgoing (SMTP Submission) server: cpanel.pccc.com
- Recommended Setting: Use SSL/TLS on port 465
- You can also use STARTTLS on port 587
- Authentication is required (using “PLAIN” or “LOGIN” mechanisms)
- Sending mail via port 25 (Generic SMTP) is no longer available
For all services, your user name is your full primary email address, including the domain name. If you use multiple addresses that are forwarded or aliased to one mail account, you must use the name of the account, NOT an address which is an alias.
Notes:
We require the use of SSL or TLS (and recommend the use of TLS version 1.1 or higher.) This encrypts your e-mail and the authentication process between your machine and our server.
If you need assistance, don’t hesitate to ask!
P.S. The best way to test your credentials is to visit https://cpanel.pccc.com:2096/. Logging in there will confirm you don’t have a username/password issue!
Generic Info for setting up IMAP or POP Email
When setting up your mail client to access PCCC’s servers, there is no perfect answer for every mail client. Because of this, PCCC’s servers are extremely flexible and support a vast array of options.
This information is suitable for configuring virtually any mail client for the IMAP or POP protocol using PCCC’s e-mail servers.
Incoming IMAP server: imap.pccc.com
- Recommended Setting: Use SSL on port 993
- You can also use non-SSL on port 143
Incoming POP server: pop.pccc.com
- Recommended Setting: Use SSL on port 995
- You can also use non-SSL on port 110
Outgoing server: smtp.pccc.com
- Recommended Setting: Use TLS on port 2025 with smtp auth enabled using the same username and password for incoming
- You can use TLS on ports 25, 587 and 2025 or non-SSL on ports 25 and 2025
Notes:
We recommend you use TLS. This encrypts your e-mail when it is being sent between your machine and our server.
Port 25 is routinely blocked by many Internet Service Providers. Try port 2025 if you are unable to send emails!
You can also use SMTP AUTH on any of the outgoing server ports. However, if it is not used, it defaults to a check before sending authentication. We only recommend using it on TLS connections.
SSL on Port 465 is no longer supported! As of March 29, 2021, PCCC has deprecated this older technology. Please use port 587 with TLS and SMTP Authentication.
If you need assistance, don’t hesitate to ask!
P.S. The best way to test your credentials is to visit https://webmail.pccc.com/. Logging in there will confirm you don’t have a username/password issue!
Setting up Email for iPhone
Here are some guidelines based on http://help.outlook.com/en-us/140/cc188654.aspx for the iphone:
- Tap Settings > Mail, Contacts, Calendars > Add Account.
- Tap Other.
- In the Name box, enter your full name.
- In the Address box, enter your full e-mail address (for example, tony@examples-magnifico.com).
- In the Password box, enter your password, and then tap Save.
- Tap either IMAP or POP. We recommend IMAP because it supports more features.
- Under Incoming Mail Server, in the Host Name box, enter your incoming server name: imap.pccc.com
- In the User Name box, enter your username (for example, tony). In the Password box, enter your password.
- Under Outgoing Mail Server, in the Host Name box, enter your outgoing server name: smtp.pccc.com
- In the User Name box, enter your username (for example, tony). In Password, enter your password.
- Tap Save.
Using SquirrelMail for WebMail
Peregrine Computer Consultants Corporation provides a very robust, yet simple and easy-to-use email system for the web called SquirrelMail. You can reach this system by using any browser and going to https://webmail.pccc.com/. You will then be prompted for your username and password. The username and password are both CASE SENSITIVE, so please type them in exactly as given.
For a first time user, it is very important to setup the webmail for your account after logging in. You will be prompted for your name and email address after login.
Additionally, if you use an IMAP Root Folder path, go to Folder Preferences and enter your path, (e.g. “IMAP-PCCC/”).
NOTE: The / on the end is important! Click Submit.
Finally, you may want to explore the options available to you. In particular, we recommend going to the Options Page and clicking on Display Preferences. You’ll probably want to set the interface to your native language (e.g. English) and select the options for JavaScript Address Book, refresh folder list every 5 minutes, Show HTML version and View Images Inline. Click Submit.
That’s all. Again, feel free to explore the options available on this program and we think you’ll find it simple and relatively painless to use.
FAQ: What happened to my Spam Folder?
Wondering where your spam folder located at the following path went? [Inbox/Sent Items/Deleted Items/Spam Folder]
In order to best serve our customers, our system performs the following automated e-mail maintenance:
- All Inboxes for Customers using IMAP are rotated Monthly to their Home Directory if they grow too large. You will receive an automatic maintenance notice with instructions on subscribing to your rotated folder.
- All Sent folders including Sent, Sent Messages and Sent Items for Customers using IMAP are rotated Monthly if they grow too large. You will receive an automatic maintenance notice with instructions on subscribing to your rotated folder.
- Folders containing Spam including Junk, Junk E-Mail and SPAM have e-mails more than 4 days old removed automatically.
- Folders containing High-Scoring Spam including SPAM15 have e-mails more than 1 day old removed automatically.
- Folders containing Deleted Items including Trash, Junk, Junk E-Mail, Deleted Messages and Deleted Items have e-mails more than 1 day old removed automatically.
- Folders containing Postmaster notices including Postmaster have e-mails more than 4 days old removed automatically.
- Folders containing Draft messages including Drafts have e-mails more than 10 days old removed automatically.
Attachment Help
HELP! I received a notice that my email was altered and an attachment was removed.- The email was received but an attachment or multiple attachments were stripped because of the attachment’s extension. Click here to view a list of blocked attachments.
- This behavior is by design. PCCC’s Raptor Anti-Spam / Anti-Malware system DOES block many attachments based on extension because of their predilection for exploits.
- The extensions we block are carefully chosen to prevent malware spreading.
- If you are working with a known sender or recipient, a simple way to allow the email to go through with attachments is to change the extension to .RENAME. The system will allow the email through and the recipient can just rename it to use the file.
- We handle quarantine retrievals as noted in the email very quickly. If you need an attachment retrieved even quicker, don’t hesitate to pick up the phone and call us!
- We filter millions and millions of emails but generally only receive a handful of quarantine retrieval requests per month. Even so, we routinely see users request attachments from quarantine that are in fact new viruses not yet picked up by virus scanners. Our manual intervention is purposeful to prevent this from harming our customers or their e-mail recipients!
Attachment Sizes
The max email size we allow is 35MB (35882577 bytes). 15MB is usually a good limit for Attachments to make sure it has a high deliverability rate. 25MB inbound is usually very safe. Note that attachments sent via e-mail are larger than they are on a hard drive. On a hard drive, files are usually in binary or 8 bit format. However, e-mails are in a 7 bit format. The conversion that occurs increases the size of attachments, often by 30%. Keep in mind that it’s the size of an e-mail that matters, not the attachment. The largest e-mail that can be sent depends on the size limit of both the sender’s e-mail server and the recipient’s server. Most size limits are around 10 MB. Keep in mind that the size of an attachment is limited to the lowest limit in the chain of servers. Even if you have a 1 GB limit, if the other server has a 1 MB limit, the maximum size of the attachment is 1 MB. Also, note that attachments are larger than the original file due to conversion from 8 bit to 7 bit. http://www.answers.com/topic/Attachment Retrieval
To request retrieval of an attachment quarantined by the Raptor, please contact PCCC by email at pccc-dot-com@pccc.com, referencing your message’s Quarantine Directory and SMTP Queue ID within 60 days. Retrieval requests are typically completed within one business day.Blocked Attachments
The following is a list of the file extensions which are blocked by Raptor Anti-Spam to help protect your computer from malicious attachments.Dropped Files
Due to the likelihood of being malware, attachments with the following extensions are blocked entirely by Raptor by silently dropping the entire message, including files containing a class ID extension:| Extension | Description | Threat |
|---|---|---|
| pif | MS-DOS shortcut | Can launch malware |
| com | Executable file | Can launch malware |
| scr | Screen Saver Script | Can launch malware |
| bat | Executable batch file | Can launch malware |
| {*} | class ID extension | Class IDs function the same way other extensions do, but without it being obvious what type of file is being used, and is commonly used to trick users into opening malware |
Quarantined Files
The files below and any .html file that contains potentially malicious Javascript code are quarantined and removed from the email. The original message with a note about the removed attachment will still be received, and the file can be retreived from the quarantine by contacting PCCC. Click here for more help with attachments and retrieval instructions.| Extension | Description | Threat |
|---|---|---|
| 7z | 7z compressed file | 7z compressed files can contain autoexecuting exploits |
| ade | MS Access project extension | Access project files Can contain autoexecuting macros |
| adp | MS Access project description | Macros |
| app | Microsoft FoxPro application / OS X binary | Executables may launch malware |
| asd | Microsoft Office automatic backup file | Macros |
| asf | Streaming video | Buffer overflow |
| asx | Streaming video | Buffer overflow |
| bas | BASIC source file | Code execution can launch malware |
| chm | Compiled HTML help file | Exploits a buffer overflow found in Internet Explorer. |
| cmd | Executable batch file | Can launch malware |
| cpl | Control panel extension | Can launch malware |
| crt | Security certificate | Can override SSL certificates and lead to Man-in-the-middle attacks |
| dll | Dynamic Link Library | Can launch malware |
| exe | Executable file | Can launch malware |
| ex | Obfuscated form of exe | Can launch malware |
| exee | Obfuscated form of exe | Can launch malware |
| exe.xz | Obfuscated and compressed form of exe | Can launch malware |
| ex_ | Obfuscated form of exe | Can launch malware |
| fxp | Microsoft FoxPro executable | Can launch malware |
| hlp | Windows compiled help file | Macros |
| hta | HTML application | (Java)script can launch malware |
| gz | Compressed archive | Compressed archive file format used to hide malware |
| img | Img ISO images became popular for DVDs | Some OSes will mount img ISO images as drives allowing for malicious software installation |
| inf | Setup information | Setup scripts can be changed to do unexpected things |
| ini | Contains program options | Program options can be accidentally installed and cause programs to do unexpected or malicious things |
| ins | Internet Naming Service | DNS hijacking/DNSChanger attacks |
| iso | ISO images became popular for CDs | Some OSes will mount ISO images as drives allowing for malicious software installation |
| isp | Internet Settings | DNS hijacking/DNSChanger, MITM attacks |
| jar | Executable Java file | Can launch malware |
| js | Javascript source file | Can launch malware |
| jse | Javascript executable | Can launch malware |
| lib | Software library | In theory, these files could be infected but to date no LIB-file virus has been identified |
| lnk | Windows shortcut | Can execute arbitrary code and run malware. Some people may accidentally attach a shortcut instead of the softlinked file |
| lzh | Compressed archive | Compressed archive file format used to hide malware |
| mdb | Microsoft Access File | Macros can launch malware |
| mde | Microsoft Access database | Macros can launch malware |
| mim | MIME-encoded file | Blocked due to an exploit in some versions of WinZip. |
| msc | Microsoft Common Console Document | Can be changed to point to unexpected places. |
| msi | Windows installer executable | Can launch malware |
| msp | Microsoft Windows Installer Patch | Can launch malware |
| mst | Microsoft Visual Test Source Files and SDK Setup file | Source can be changed to make your computer work unexpectedly |
| ocx | Object Linking and Embedding (OLE) Control Extension | Can launch malware. |
| one | Microsoft OneNote | Can launch malware. |
| pak | Chrome Extension | Can launch malware. |
| pcd | Kodak proprietary photo CD image | Can launch malware. |
| pdf.xz | Compressed Pdf files | Can launch malware |
| prg | FoxPro program source file | Can launch malware |
| rar | RAR compressed file | Can lead to remote code exploits due to self-extracting archive capabilities |
| r00 | RAR partial archive compressed file | Can lead to remote code exploits due to self-extracting archive capabilities |
| reg | Registry file | Can change system settings and cause unexpected behaviour |
| sct | Windows Script Component | Can launch malware |
| sh | UNIX shell script | Can launch malware on UNIX workstations |
| shb | Shell Scrap Object File | Can launch malware |
| shs | Shell Scrap Object | Can launch malware |
| sys | System Device Driver | Can launch malware, kernel level. |
| uue | UUE archive file | Can be used to hide malware files |
| url | Bookmarked URL | File with a web URL that can open nefarious |
| vb | VisualBASIC runtime | can execute arbitrary code |
| vbe | VisualBASIC | can execute arbitrary code |
| vbs | VisualBASIC script | can execute arbitrary code |
| vcs | Calendar file | Buffer overflow in old Outlook versions |
| vxd | Virtual Device Driver | Can launch malware |
| wim | Windows Image Format | Can launch malware |
| wms | Windows Media Player Skin | Can launch malware |
| wsc | Windows Script Component | Can launch malware |
| wsf | Windows Script File | Can launch malware |
| wsh | Windows Scripting Host Settings File | Can launch malware or cause unexpected behavior |
| xll | Microsoft Windows Executables | Can launch malware |
Conditionally Blocked Files
In addition to the above formats, some files are only blocked if certain conditions are met due to their widespread use.| Extension | Description | Conditions and Reason |
|---|---|---|
| zip | File Archive | ZIP archives contents are scanned using the same rules above. ZIP files which appear to be corrupted or in the wrong format (Files with a bad “magic file number”) are blocked, since they may contain exploits or executable malware. |
| eml | Email message attachment | Email forwarded in this manner without being marked as multipart alternative are quarantined, since a client may inadvertently open this extension automatically and execute malware. |
Disabled HTML Tags
In addition to scanning message attachments, Raptor will also scan HTML messages for potentially malicious content including the following:| Tag | Reason |
|---|---|
| iframe | Iframe tags are used to “frame” or embed a remote website inside of an HTML email, and is blocked by Raptor due its use for phishing and tracking user email habits. |
| object | The object tag is used to embed audio, video, ActiveX, PDF, Flash, and Java applets in an HTML document, which can be exploited on some clients to launch malware. |
| script | The script tag is used to embed a Javascript or other executable program into an HTML document, and can be exploited to launch malware. |
Previously Blocked Files
Below is a list of files which were previously blocked by our spam filters, but since have been removed. Reasons for their removal from the block list may include the widespread prevalence of a certain format, and the use of better secured software by clients.| Extension | Removal Date | Reason |
|---|---|---|
| rar | 2012-07-25 | RAR files have had exploit vectors but the prevalence of the file format is too high. Please make sure you are using recent and secure software to handle RAR files. |
| vcs | 2013-05-11 | Old versions of Outlook contained buffer overflows which could be exploited when importing a calendar. The prevalence of the format and use of clients that no longer suffer from this vulnerability has prompted the removal of this file block. |
Raptor Continuity End User Guide
User Guide
- Obtain your continuity password and login URL from your administrator.
- Log in with your email address and the provided password at the login URL.
- Optionally, you may also setup a desktop mail client. (Steps Detailed below)
Setting up Continuity IMAP
Thunderbird
- Request your continuity password and mail server information from your Administrator.
- Go to File -> New -> Existing Email Account
- Enter your email address and continuity password then click Continue.
- Click Manual config.
- Change the server settings to those provided by your Administrator.
- Change the username to be your complete email address.
- Click Re-test.
- Click Advanced config.
- Click Outgoing Server (SMTP).
- Select the row that lists your username as your full email address and click Edit.
- Change the Authentication Method to No authentication.
- Click OK.
- Click OK.
Outlook
- Request your continuity password and mail server information from your Administrator.
- Go to File -> Add Account.
- Select Manually Configure and click Next.
- Select Internet E-Mail and click Next.
- Enter your name and email address.
- SELECT IMAP account type.
- Enter the server settings provided by your Administrator.
- Enter your full email address as the username and your continuity password.
- Click OK, then Next.
Raptor Continuity Admin User Guide
- Using raptor.pccc.com, enter your domain and click Next.
- Login to the Raptor Customer Dashboard with your Raptor Customer Admin credentials.
- In the top or bottom ribbon under Raptor Continuity, select the Raptor Continuity Management option in the drop-down menu.
- Decide if you want to mass generate credentials or set them per account
- If you want to mass generate credentials, click the Generate Continuity Credentials button. (This will only add a password if the account has no continuity password already set.)
- If you want to set the credentials per account:
- Click Edit on the account you want to set credentials for.
- Type the new Continuity password into the box.
- To save the new password click Edit Account.
- To return to the previous page click Back to Account List.
- Provide the users with the accounts credentials and the link to login to the Raptor Continuity Portal.
- The link can be copied from the address bar if you click the Raptor Continuity option in the ribbon.
- The username is the full email address of the user.
- When the outage ends, you can instruct your customers that they can return to using their normal email client.
Outlook Spam Folder Rules
Microsoft Outlook Raptor Anti-Spam Rule Recommendations
The Raptor Anti-Spam / Anti-Malware system labels unwanted emails with “[Spam]” in the Subject header. Some users receive hundreds and thousands of these unwanted emails per day so filing them away becomes imperative. These instructions will help you make two rules to filter out these emails with Microsoft Outlook.
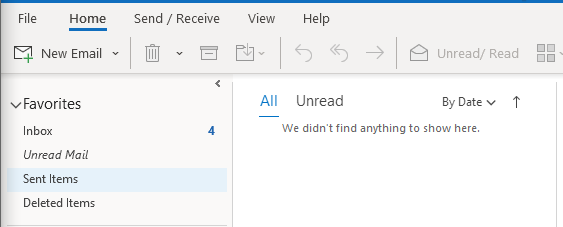
1. Create 2 Folders to hold Spam marked by Raptor: 1 folder for Spam below a score of 15, and 1 for Spam scoring 15 and over.
A. On your Inbox you will Right Click and select “New Folder”.
B. Create another Folder and name it SPAM15. (If Outlook 2019 created a “spam” folder, name this new folder “spam15” for consistency.)
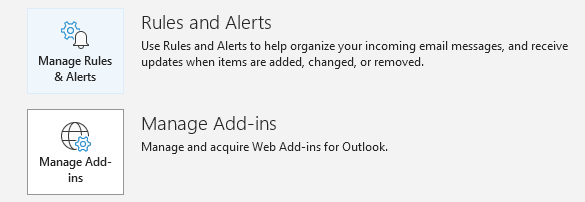
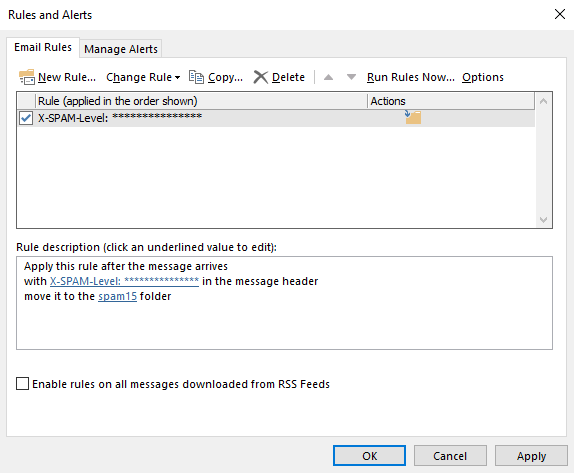
2. Now go to the File tab.
3. Click on Rules and alerts.
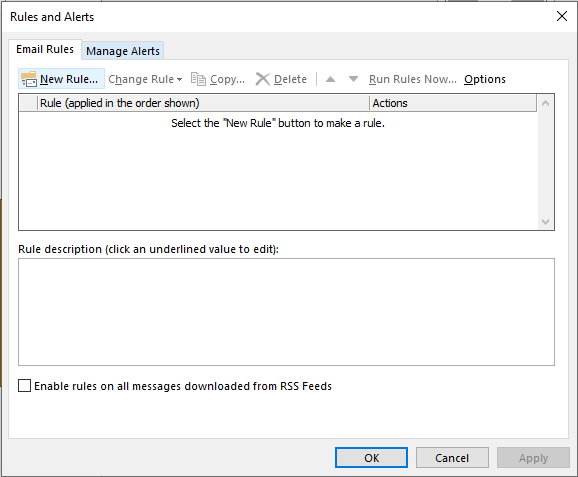
4. Click on New Rule and start from a blank rule.
5. Select “Apply rule on messages I receive” and click Next.
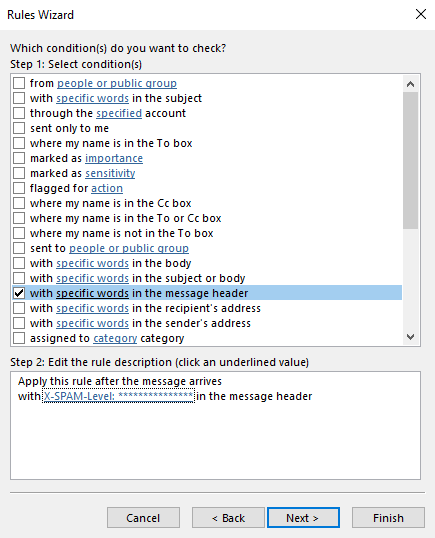
6.Check the condition “with specific words in the message header”
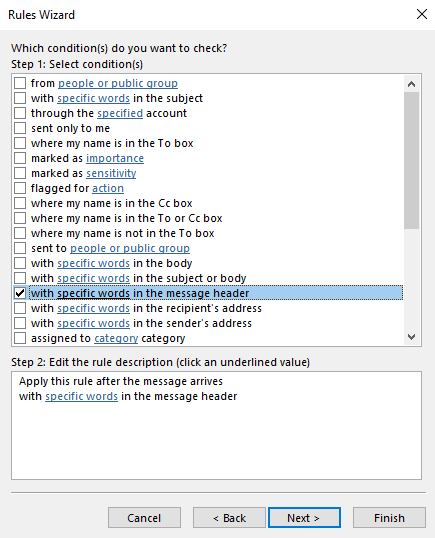
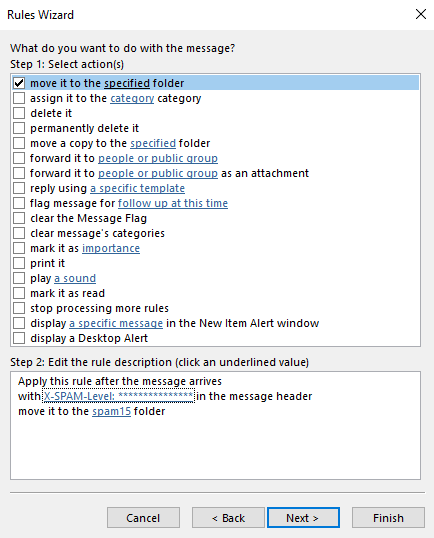
7. Click on “specific words” link in Step 2.
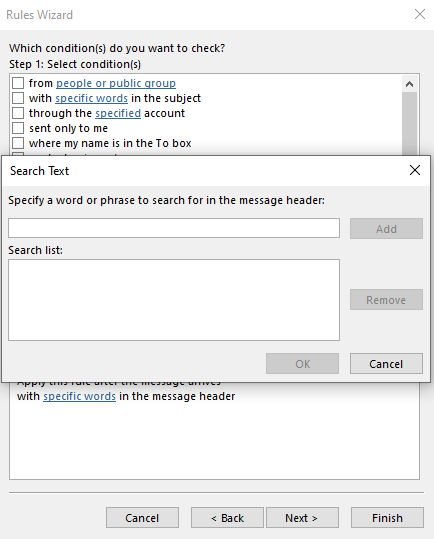
8. Enter “X-SPAM-Level: ***************” without the quotes in the Search Text box.

9. Click Add
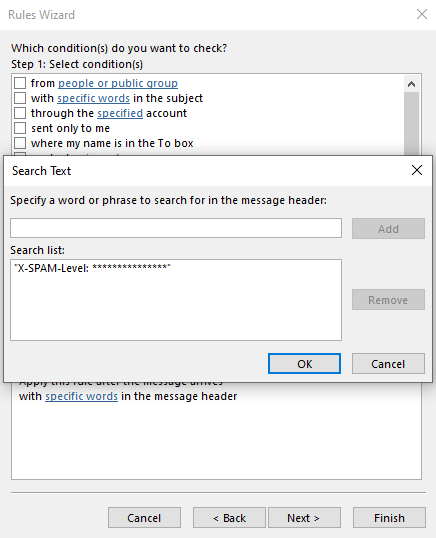
10. Click OK
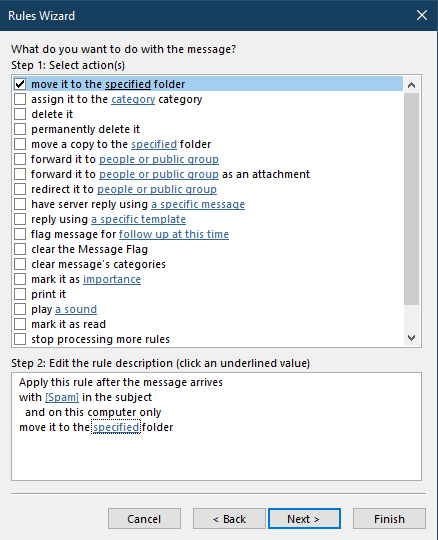
11. Click Next and select “move it to the specified folder”.
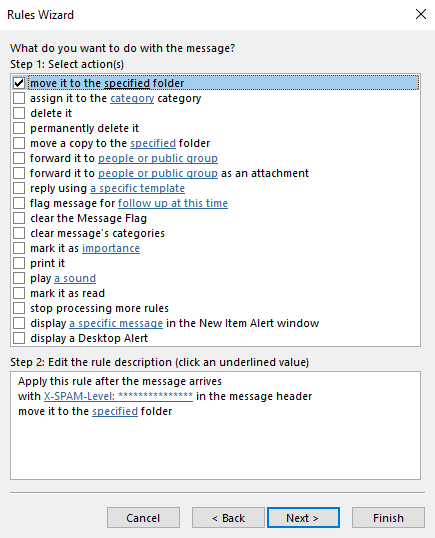
12. Click on “specified” link in Step 2.
13. Choose the “SPAM15” folder.
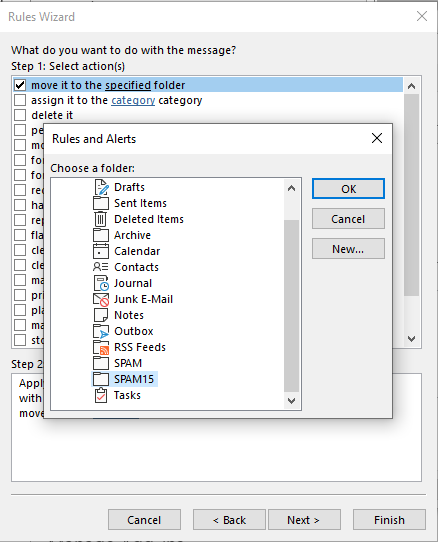
14. Click OK.
15. Click Finish.
16. Click on New Rule and start another rule from a blank rule.
17. Select “Apply rule on messages I receive” and click Next.
![]()
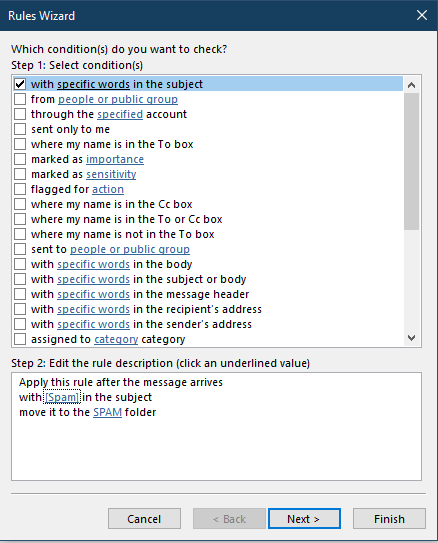
18. Check the condition “with specific words in the subject”

19. Click on “specific words” link in Step 2.
20. Enter “[Spam]” without the quotes in the Search Text box.

21. Click Add.
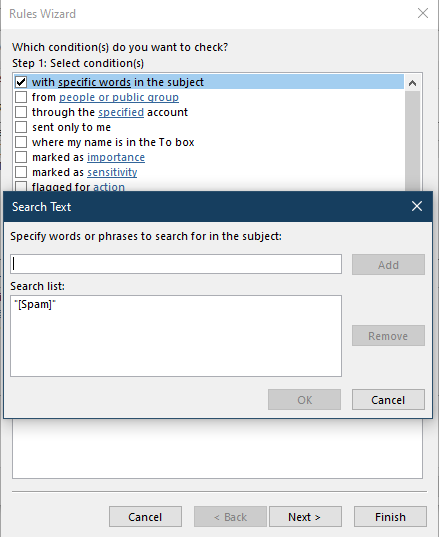
22. Click OK.
23. Click Next and select “move it to the specified folder”.
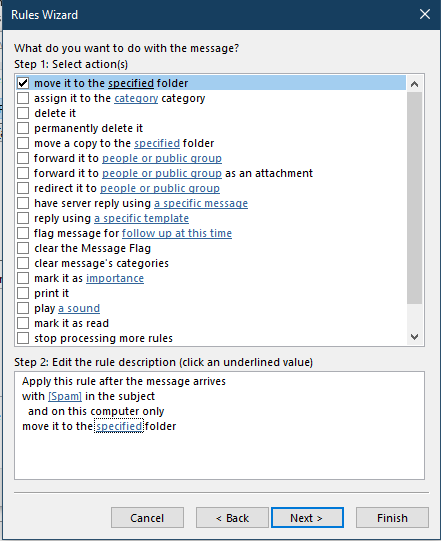
24. Click on “specified” link in Step 2.
25. Choose the “SPAM” folder.
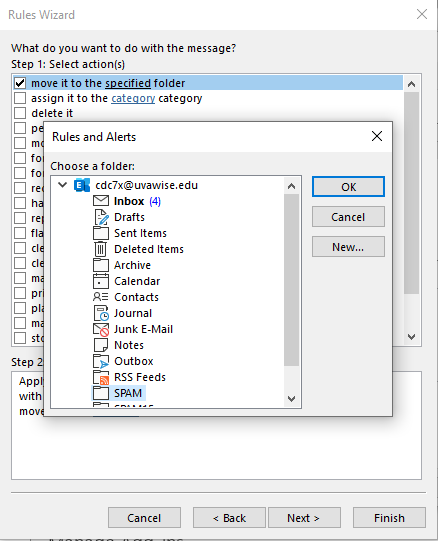
26. Click OK.
27. Click Finish.

28. It’s important that you run the SPAM 15 & Over Rule first. If you created the rules in a different order, use the up/down arrows to change the order of the rules.
29. Click Apply
Periodically, you should check these folders and delete the unwanted e-mails. Also, if an email is missing, you check these folders (and the Junk Email folder if you use Outlook’s Junk Email Filter) first. Because a higher score indicates an email is more likely to be spam, you should not have to check the SPAM15 folder as often as the SPAM folder.
Thunderbird Spam Folder Rules
Mozilla Thunderbird Raptor Anti-Spam Rule Recommendations
The Raptor Anti-Spam / Anti-Malware system labels unwanted emails with “[Spam]” in the Subject header. Some users receive hundreds and thousands of these unwanted emails per day so filing them away becomes imperative. These instructions will help you make two rules to filter out these emails with Mozilla Thunderbird
- On your inbox, Right Click and select “New Folder”.
- Name the new folder Spam
- Create another folder named Spam15.
- Left Click on the email account name above Inbox.
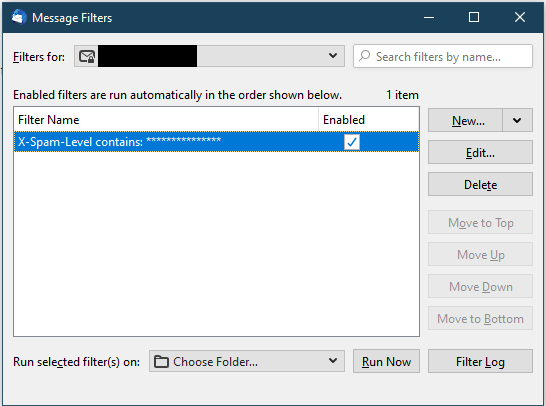
- Select “Message Filters”.
- Click New… to start from a blank filter rule.
- Ensure Getting New Mail: is checked.
- Click the drop-down that by default states Subject and select Customize.
- In the pop-up box, enter X-Spam-Level.
- Click Add
- Click OK to close the pop-up and X-Spam-Level will now be selected.
- Enter “***************” without quotes in the right-most text box

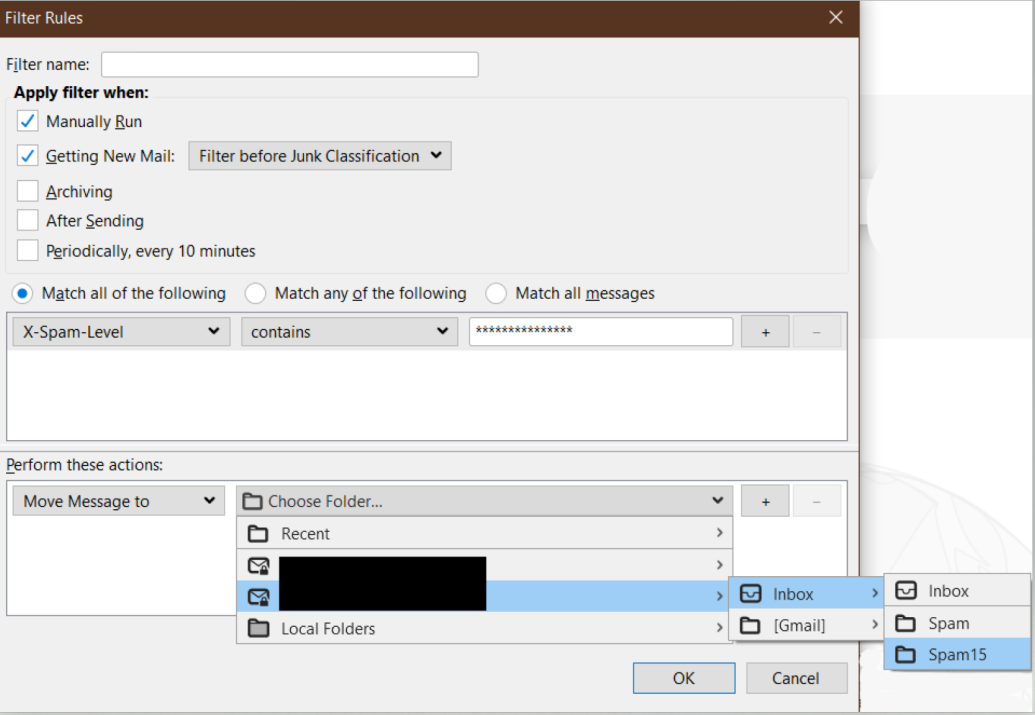
- Under “Perform these actions:”, select “Choose Folder…”
- In the drop-down, select your email account, select Inbox and then choose the Spam15 folder
15. After verifying the information click OK to add the new Filter Rule
16. Next, click on New and start another blank rule.
17. Ensure Getting New Mail: is checked.
18. Ensure the far left drop-down states Subject and in the right-most text box enter, “[Spam]”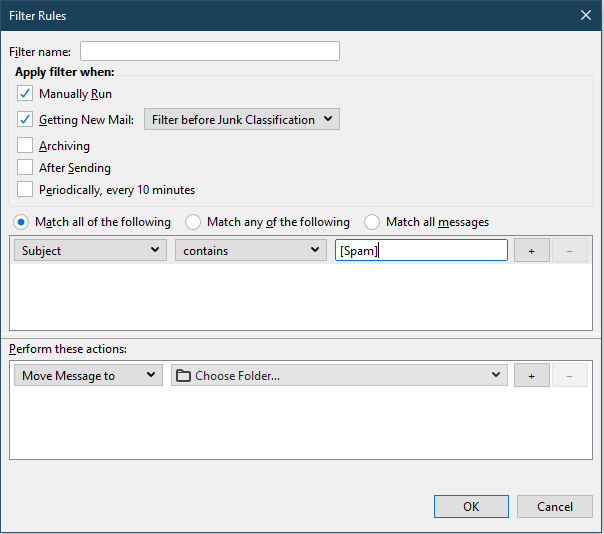
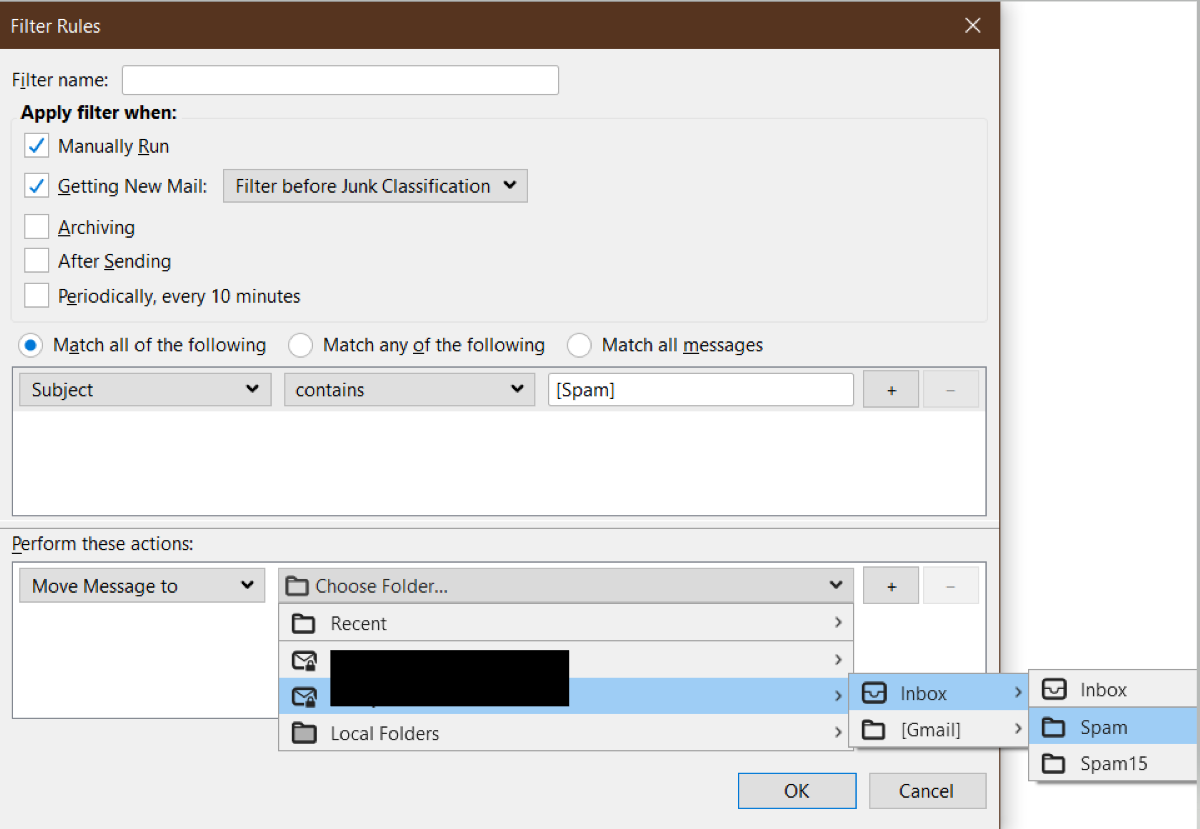
19. Under “Perform these actions:”, select “Choose Folder…”
20. In the drop-down, select your email account, select Inbox and then choose the Spam folder
21. After verifying the information click OK to add the new Filter Rule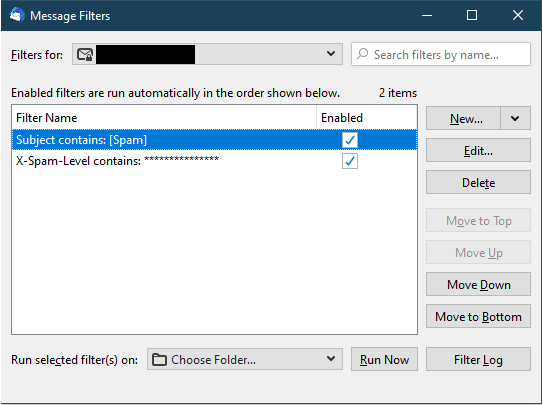
22. It’s important that the Spam15 Rule is first. If you create them in a different order, use the Move Up and Move Down options to change the order.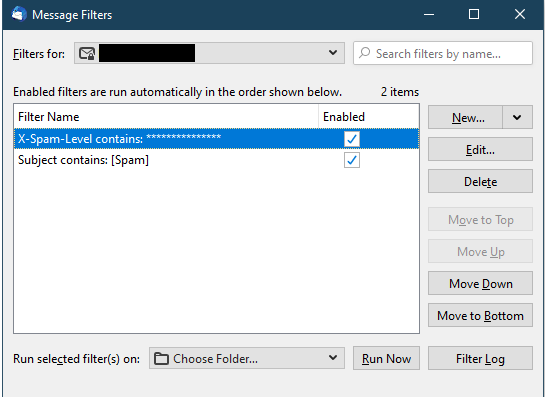
23. Periodically, you should check these folders and delete the unwanted emails.
If an email is missing, you should check these folders first.
Because a higher score indicates an e-mail is more likely to be spam, you should not have to check the Spam15 folder as often as the Spam folder.
No Reply Address Setup for cPanel
If you legitimately use addresses like noreply@ to send emails, you need to ensure that address exists.
If you use cPanel, the following will do so and limit the storage for the account to 1 MB.
- Login to your cPanel account at :2083 (For example: cpanel.pccc.com:2083)
- Under the Email section, click Email Accounts.
- Click Create.
- Select the domain that needs the new account.
- Enter noreply as the username.
- Setup a password that meets the requirements or autogenerate. (This account should rarely/never be logged into.)
- Click Edit Settings.
- Set 1 MB storage space.
- Under the Automatically Create Folders for Plus Addressing, select Do Not Automatically Create Folders.
- Create the account.
- Under the Email section on the main dash, click Forwarders.
- Click Add Forwarder.
- Enter noreply in the address line.
- Click Advanced Options to reveal more options.
- Select Discard then Add Forwarder.
NOTE: Add other aliases to this account as needed.
Need Additional Help?
Let our experts take over!
Email Us
support@raptor.us
Call Us
+1.703.359.9700
Company
Get in Touch
Copyright © 1993 – 2024 Peregrine Hardware, Inc.
All trademarks and registered servicemarks are the property of their respective companies.